

I’ve been assigned to a NetApp storage device replacement project as the support guy of our team. My task was to plan and perform storage migration of a physical 2-node SQL 2012 cluster. The cluster serves as the database backend of a Sharepoint farm with several thousands of sites and over 5 TB of data. The challange was – as usual – the short maintenance window, in our case 4 hours in a month. Unfortunatelly the new SAN device wasn’t capable of a storage snapshot sync mechanism, so I had to do the move myself at the application level.
The SQL cluster
The SQL cluster is using several LUNs for the databases and for the Quorum. The 3 instances configured to store system files and databases on the root partition of a LUN and additional LUNs for user database and log files are mounted under a Data and Log folder on the same drive further separated by different purposes. For example the first instance deployed to a LUN assigned the letter G. The G:\MSSSQL.INSTANCE01 stored the system databases. The same instance’s user databases stored on a different LUN which mounted to G:\Data\Internal01 and the logs also used a different LUN and mounted to G:\Log\Internal01.
Log shipping to the rescue
I decided to go with log shipping. This is quite a simple and reliable way to replicate databases across different SQL servers with a little bit of effort. Basically what it is doing is schedule several SQL jobs to backup the transaction logs, copy the logs from the source to the destination location and restore it on the destination server.
My first idea was to add the new LUNs to the cluster, restore all databases to there with log shipping and finally remove the old LUNs.
The tricky part in my case was that I had to replicate to the same SQL server… That means I’d had to restore the shipped databases to the new drive but with a different name. This would have made the whole process much more complicated, because I’d have to swap both the logical and the physical database names.
Failover cluster cross shipping
I quickly figured out a solution. Since 3 separate instances was running on the cluster I can select one of them to ship the logs and vica versa. So the high level plan looks like this: 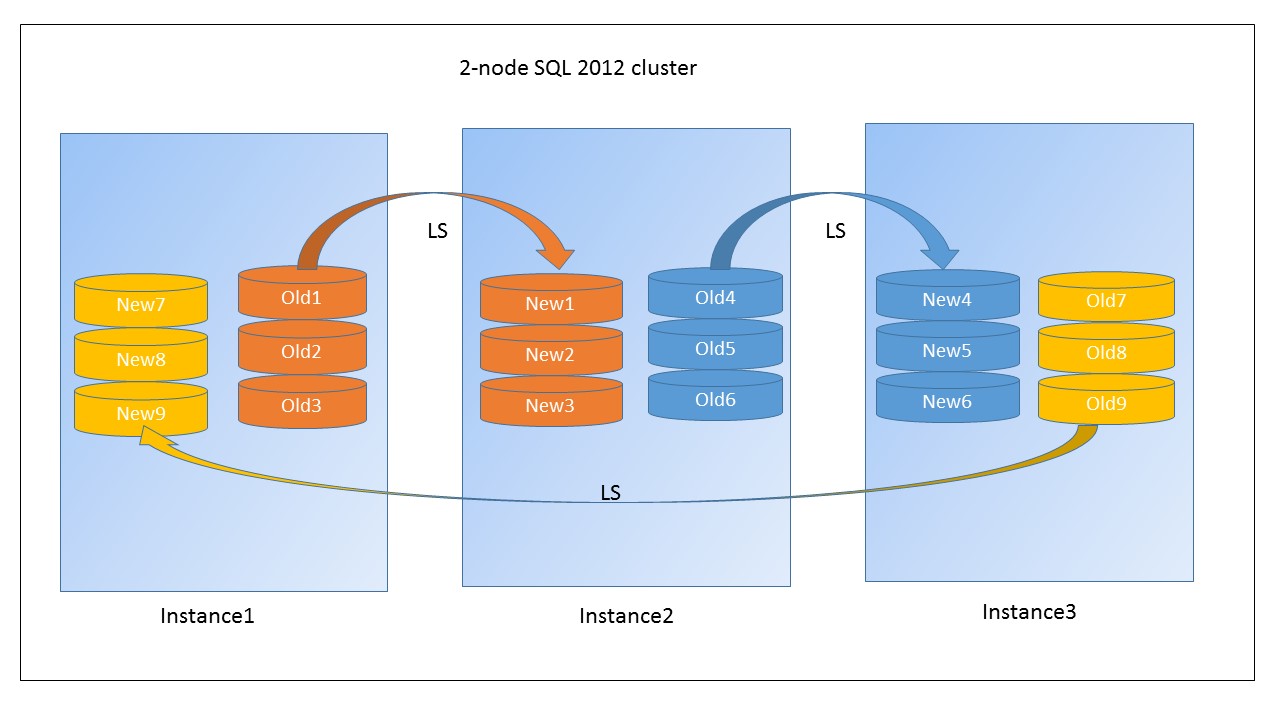
The next challenge was the number of databases on each instances. To configure log shipping from SQL Studio you have to click through several configuration windows. This is fine for 1 or 2 databases, but not for several dozens. However, SQL Studio is a great tool for automation! You can easily make a T-SQL script from what you just clicked through. And here is a great example of how you can use it to configure multiple databases with log shipping. I used this article successfully to create my own workflow.
The final plan
After some testing I made the following 5-steps plan:
- Preparation
- Add new disks and replicate existing folder structure with permissions
- Cluster configuration migration
- Re-configure the quorum disk
- Log shipping configuration
- Prepare databases’ recovery model and implement log shipping
- Migration
- Do a final backup/restore operation and swap the disks
- Post-migration cleanup
- Restore original recovery model on databases and remove old disks
Step 1 – Preparation
Since every LUN planned to be replaced including which were storing SQL system folders I had to be sure that all the folder structure will be the same on the new LUNs and their permissions are set correctly. After the new LUNs attached I used ROBOCOPY to replicate folders, files and their permissions from the old locations. Since database files were in use I just simply used the /MIR switch and set the retries to 0 this way ROBOCOPY skipped all the files which were in use. Since these are the actual database files, I didn’t had to be worry too much about them, because they’ll replicated with log shipping. Additionally full permissions granted to the other instance’s SQL service and SQL agent on the user data and log folders. This was necessary, because initially the new LUNs where we planned to store the shipped databases will be attached to a different instance so during the log shipping it must had access to it.
I used a temporary LUNs for storing log shipping files and they also needed some preparation. I created some shares and configured the permissions to allow full access to the SQL instance’s and the SQL agent’s service accounts to be able to store the initial backups and the subsequent log backups.
After all disk preparation was done the new disks could be added to the cluster then assigned to a role and manually configured on the SQL resource as a dependency. With this final task the cluster was prepaired for log shipping.
Step 2 – Cluster configuration migration
This is a straightforward step, simply changed the quorum disk configuration with the cluster configuration wizard. This could be done online, no downtime is expected normally during the operation.
Step 3 – Log shipping configuration
The actual fun started here. For log shipping the database which planned to configure must be set to use the FULL recovery model. First I checked the recovery model settings for all databases, except system to document the initial configuration:
SELECT name, recovery_model_desc
FROM sys.databases
WHERE name NOT IN (‘master’,’model’,’msdb’,’tempdb’)
Then set those database to FULL which weren’t use it:
USE MASTER
declare
@isql varchar(2000),
@dbname varchar(64)declare c1 cursor for select name from master..sysdatabases where name not in (‘master’,’model’,’msdb’,’tempdb’)
open c1
fetch next from c1 into @dbname
While @@fetch_status <> -1
begin
select @isql = ‘ALTER DATABASE @dbname SET AUTO_CLOSE OFF’
select @isql = replace(@isql,’@dbname’,@dbname)
print @isql
exec(@isql)
select @isql = ‘ALTER DATABASE @dbname SET RECOVERY FULL’
select @isql = replace(@isql,’@dbname’,@dbname)
print @isql
exec(@isql)
select @isql=’USE @dbname checkpoint’
select @isql = replace(@isql,’@dbname’,@dbname)
print @isql
exec(@isql)fetch next from c1 into @dbname
end
close c1
deallocate c1
By now all databases prepaired to be configured for log shipping. The detailed steps how to do it can be found here. Before I configured my databases I asked the backup team to pause backup policies during the operation not to interfere with my log shipping backups. This step took a while, but eventully all my databases successfully started shipping logs to the new LUNs. Everything was working well and all set for the actual migration.
Setp 4 – Migration
So far no downtime occured and after a 2 days all my 5 TB data were sitting on the new LUNs waiting for swapping the drive. Does it cool, isn’t it? To avoid inconsistency I decided to completly shut down the whole Sharepoint farm. After all front-end and application servers stopped I triggered all backup jobs to do a final log backup, then I disabled them. I did the same with the copy and restore jobs as well. At this point the databases on both the old and on the new LUNs were in sync. Now I brought online all shipped databases on the temporary instance:
RESTORE DATABASE “database” WITH RECOVERY
Then I detached them from both the original and the temporary instance:
EXEC master.dbo.sp_detach_db @dbname = N’database‘
It’s time to swap the cluster disks! I stopped the original SQL instance cluster resource and removed the original cluster disks from the cluster resource. The temporary SQL instance were still running and serving other databases, so I had to delete the new LUNs from the temporary SQL instance cluster resource’s dependency which now contained the shipped databases to be able to safely remove them from there as well. At this point both the original and the new LUNs were detached from both cluster resources. Now I only had to assign the new LUNs to the original cluster resource, added them as dependency and swap the drive letters. I also had to inherite permissions to the shipped database files from above folder where they were stored. Only the system databases were left, but they could quickly copied over to the new LUN. The swap was done, the database files were sitting on the new LUNs and assigned to the original SQL instance cluster resource. SQL engine started successfully and the last step is to attach the shipped databases back to the original instance:
CREATE DATABASE “database” ON (FILENAME = N’G:\Data\Internal01\database.mdf‘),(FILENAME = N’G:\Log\Internal01\database_log.ldf‘) FOR ATTACH
The final step is to start the Sharepoint servers and check their logs. The whole downtime took approximately 1,5 hour, because I made a small mistake (forgot about secondary database files) and some Sharepoint content databases weren’t attached. But this is still acceptable compared to the time would needed for a manual database move. After this error fixed the farm brought successfully online and everything was the same as before, except the databases were running from the new storage device.
Step 5 – Post-migration cleanup
To cleanup after myself I disabled log shipping configuration which also removed the SQL jobs, removed the log shipping shares and set the databases’ recovery model back to their original state and finally enabled the central backup policies. The cluster disks were already removed and put offline during the migration so the only had to removed from the cluster nodes by the storage team.
Conclusion
This project wasn’t too complicated, but certainly required lot’s of preparation and checklists based on the collected information. With that I was able to quickly find which databases were missing and where were those secondary database files as well as easily visualize which database were replicated from which lun to which instance and lun. So, the key, as always, the good and comprehensive planning and testing.